A DLL error is any error with a DLL file – a kind of file ending in the DLL file extension.
DLL errors can appear in any of Microsoft’s operating systems including Windows 10, Windows 8, Windows 7, Windows Vista, and Windows XP.
DLL errors are especially troublesome because there are so many of these types of files in existence, all with the potential to cause trouble. Luckily, there are several troubleshooting steps you can take that have a great chance of fixing any DLL error you might have.
1 Restore the deleted DLL file from the Recycle Bin
You may have simply accidentally deleted the DLL file.
Most DLL errors come in the “DLL Not Found” and “Missing DLL” form. The easiest possible cause of a DLL error like this is that you’ve deleted the DLL file without realizing it.
2 Use System Restore to undo recent system changes.
If you suspect that the DLL error was caused by a change you or someone else made to your registry or other system configuration then a System Restore could end the DLL error.
3 pdate drivers for any hardware that might be related to the DLL error
For example, if you’re receiving a “Missing DLL” error when you use your printer, try updating your printer drivers.
4 Run the sfc /scannow command to replace any missing or incorrect operating system related DLL files.
System File Checker (the proper name of the sfc command) will replace any damaged or missing Microsoft supplied DLL files.
System File Checker is a utility in Windows that allows users to scan for corruptions in Windows system files and restore corrupted files. This article describes how to run the System File Checker tool (SFC.exe) to scan your system files and to repair missing or corrupted system files. If a Windows Resource Protection (WRP) file is missing or is corrupted, Windows may not behave as expected. For example, some Windows functions may not work, or Windows may crash.
5 System Restore
If the DLL error can’t be fixed by working around it, you may try restoring your computer to an earlier date when the DLL file was in working condition. To do this…
- Start the computer in Safe Mode. (Press F8 when booting the computer and select the safe mode option)
- Press the Windows key and the R key at the same time to open the Run prompt.
- Type into the Run prompt: rstrui.exe
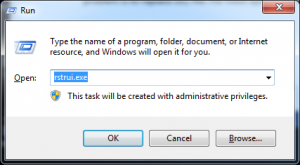
- Press Enter. The Windows System Restore wizard will open in a new window.
- Click Next to proceed.
- The next step is to select the date you want to restore to. Check the box next to Show more restore points to see older restore points. Select a restore point before the time when the DLL error started and click Next.
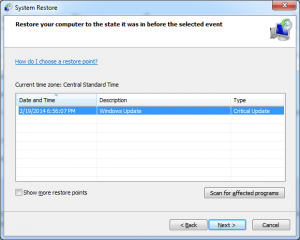
- Click Finish to confirm the selected restore point.
Log back into Windows normally. If the error persists you may try another restore point or continue troubleshooting below.
6 Apply any available Windows Updates.
Many operating system service packsand other patches can replace or update some of the hundreds of Microsoft distributed DLL files on your computer.
7 Perform a repair installation of Windows.
If the individual DLL troubleshooting advice above is unsuccessful, a repair installation of the operating system should restore all Windows DLL files to their original working versions.